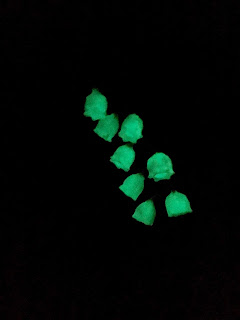
Well, I'm a bit of a nerd, and so is my soon to be husband, and we both love Zelda (Nintendo game series for those who don't know about it. Look it up)
So, I decided to be a bit unconventional and our wedding will be Zelda themed (Breath or the Wild game to be exact) with some minor visits from the other games in the series).
However, there are a lot of things that don't exist in our world that exist in this video game world (who'd a thunk that😉)
For instance in Breath of the Wild there is a beautiful flower called the 'silent princess', and then there is another one called the Blue Nightshade, which by the title of this post, is what I have been making.
And that is basically what it looks like.
(You guys can check out this really cool website that explains what the flowers were based off of: here)Now the fun part, is that they glow at night (glow in the dark) and I am a stickler for glowing things (and you'll see that more later as well in my posts).
Well, I found out what flowers they are based off of 'lily of the valley' however they are white and small; not blue, decently large and glow at night.
So, I was a bit upset at that.😩😉
Any who, let's jump into how I am fixing that. (and how you guys can do that, if you so desire)
What you'll need (or what I used in this case) is:
plastic (not silk or any fabric flowers) lily of the valley flowers (yes these are fake)
I used Mona brand on amazon but shop around as you want
glow in the dark glue (blue color)
I got these at Walmart in the school section for 4-5 US dollars and it did all my flowers, but you can opt for paint. (it just gets really expensive with paint) Besides, the glue glows for a long time so it will get the job done nicely.
paint brush (I had one on hand, that had seen better days) and FYI, make sure it is cheap since you are using it with glue (but not the hard brush ones; they don't work as nicely)
clippers (like fingernail clippers or even can use your finger nails if you are comfortable with them)
place to let things dry and not touch other things (see pictures for what I mean... it's hard to explain)
And that's all!
First, (after you have assembled everything) separate the flowers and the leaves from the stem.
Now apply the glow in the dark glue (or paint) on the inside of the flowers. (I just squeezed a glob inside) This is why you get plastic by the way, and not silk or fabric flowers
The glue doesn't move too much so you can set aside and let it dry.
Once dry, check your flowers, some have plastic parts that weren't trimmed when they were made.
Make sure to clean them up first, (either before or after painting the inside) then put one set of flowers on back on a sturdy part of the stem and get ready to paint.
It's a bit tricky at first, but you get plenty of practice. Put the glue around the top and pull it down. Try to get a decent coating, but it doesn't have to be perfect.
Once it is dry, simply put it back together and then enjoy having your own glowing flowers from Zelda Breath of the Wild.


No comments:
Post a Comment